
Shopify 2.0 completely changed the way filtering works. We now have a brand new Filters section in the Shopify dashboard under Navigation.
We can finally filter by Price, and we can filter by product options like size or color without having to tag products with all those options as we had to do before, which was a lot of repetitive work.
On the other hand, we are losing tag-based filtering. And I know that is a big deal for many of you, because your whole store might have been organized around tags, and now you have to rethink your whole system. It’s ok though - I’m going to provide some recommendations for you in this article on how you can transition.
First I’ll quickly discuss the main difference between the old filtering system and the new one in Shopify 2.0.
And then I’ll move on to teaching you everything about the new filtering system in Shopify 2.0.
- I’ll show you how to set up basic filters like size and price, then I’ll show you how to create your own custom filters using metafields, my example will be filtering by fabric, so there will be cotton, wool, or polyester. And you can apply this knowledge to whatever it is you sell.
- I’ll also briefly talk about color filters and why this is the most difficult filter to set up. But I will be publishing a separate article (and video) for color filters also.
- And finally I will discuss filtering apps, and the situations when it might be best for your store to use a filtering app rather than the native filters, for example if you still really need filtering by tag.
Native Shopify Vs Theme Filters
Filters are finally a native part of Shopify instead of just being a feature of a theme. This is probably the biggest change and, the reason why everything else has changed.
Filtering in Shopify used to be done inside the theme. Some themes had filters and some did not. So if you wanted filters you had to get a theme that had that feature.
And what you would do is tag all your products, and then set up the filters inside the theme customizer - not inside the Shopify dashboard.

Also this was kind of inconvenient because every theme had a different way of setting them up. You had to read the instructions for that particular theme, and then name your filters accordingly, usually with underscores or dashes or some specific format so that those filters got grouped and would show up in the correct way. e.g. - https://help.invisiblethemes.com/article/73-group-filtering
This was bad for a few reasons:
- Confusing - my clients often asked me to help with a “bug” with their filters really when it was just a matter of naming the tags correctly.
- Time consuming - You had to do all this tagging manually or use a bulk editing app
- Messy - you’re creating a whole lot of uneeded tags on every product.
- Not standardized - if you changed themes, you would lose all these filters because the new theme would have some different kind of system.
So in general it was just hard to manage.
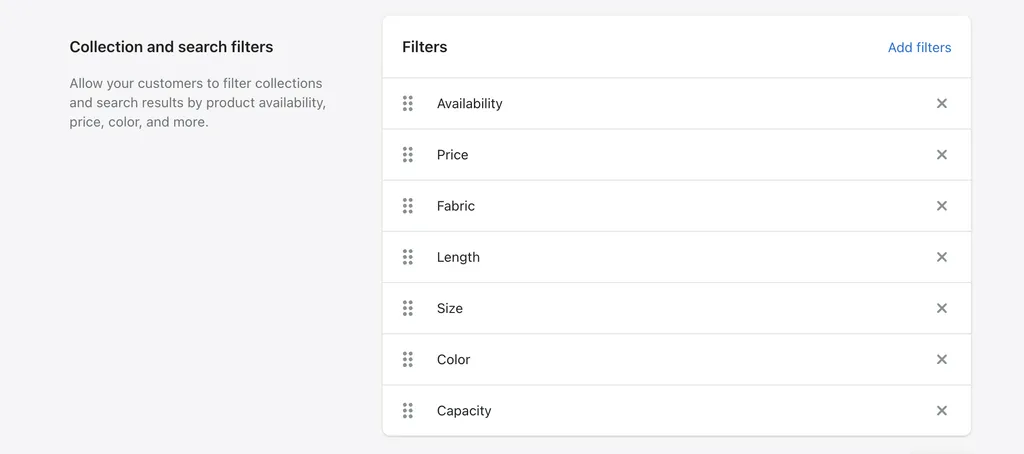
So now, we finally have filters built-in to the Shopify admin. You can find them under the Online Store > Navigation page.
It’s a lot easier to use, at least for the basic filters it just makes sense - you simply tick what filters you want to activate.
You don’t need to do a whole bunch of tagging, so you save time and your product stays cleaner, and this also means the filters are now standardized and will work across all themes in exactly the same way (except for color filters, but I’ll get to that).
But still, now when you change or update themes, your filters stay intact, completely separate from the theme, and you don’t worry about moving them to the new theme. They will just work.
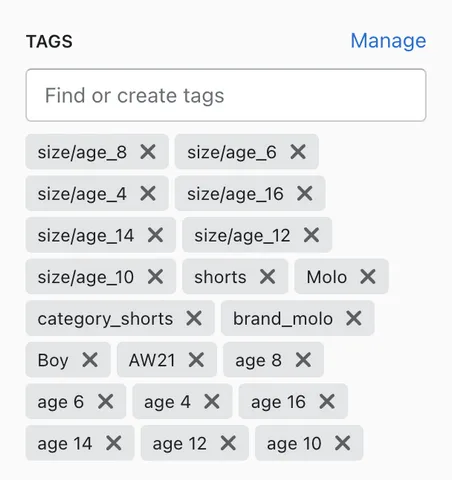
No more tag filtering
There is a downside though for many stores, and that is that tag filtering isn’t even an option anymore. So If you were reading this to confirm that - yes, it’s true - no more tag filtering.
You will still be able to add tags to products but the idea is that they are more used for the internal admin organization of your store - for things like automatic collections - and not so much for customer-facing things like filtering.
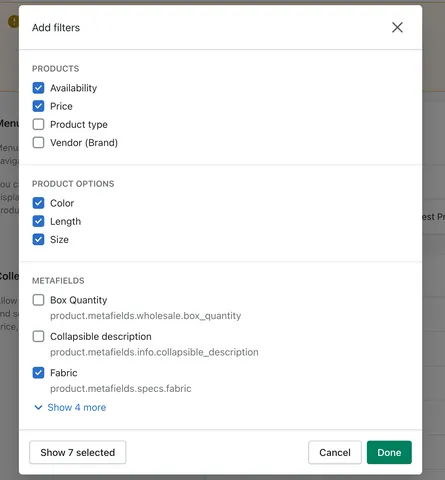
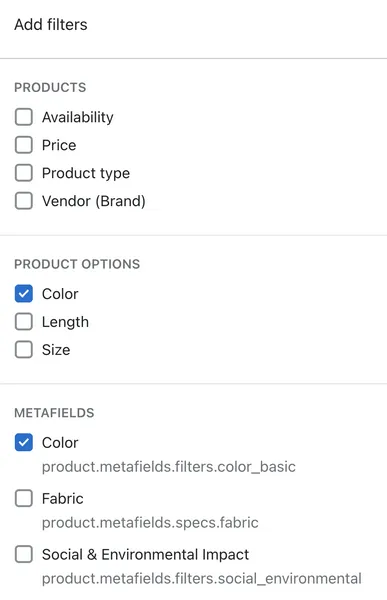
Instead of tags, the new filters use actual product data - things like the price, the product type, the vendor, the product options like size and color, and of course metafields for all those custom filters.
Let’s talk about each of those in a bit more detail.
Filter using product properties
Properties are basically the characteristics of that product. The data we have about the product.

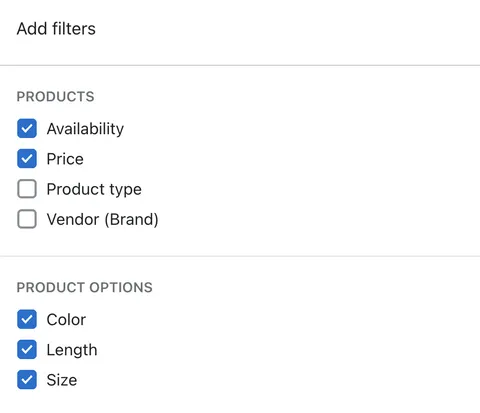
As you can see, there are four product properties that we can filter by:
- Availability
- Price
- Product type
- Vendor (Brand)
That’s all there is to it. You can’t add to these. These are the four default filters that every Shopify store will have.
The most useful of these is obviously the price filter, people had crazy tagging systems to get price filters working with tags, like tagging products with the price range of that product like two numbers separated by dashes, and that was just a headache so it’s great that we don’t need to do that anymore.
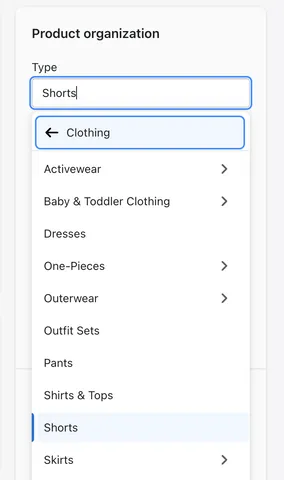
And also the product type - I know many stores didn’t really fill in that field, because it wasn’t very useful. But now it is, and you should think about making some specific and well-named product types that will help your customers browse your store.
Filters using product options
For something like size or color.
The options here are coming from the products that I have in my store. If my products did not have any options, then this list would be blank.
Likewise, if I create a new product, for example a water bottle, and it has two variants for the capacity, it comes in 1L and 500ml, then the capacity filter will show up along with the color, length, and size as I had before.
Another thing you should be careful of, is that when you delete all the products on your store, that have a certain option. The filter will disappear.
I know color is also a common product option, but actually you might not want to use this filter and set up color as a metafield instead.
I’ll explain why a bit later because first you need to understand what metafields are and how to create custom filters using metafields.
Custom filters using metafields
There is someone reading this, thinking - “But Ed, my store has 4000 products, we don’t sell something easy like t-shirts, we sell car parts and our store has various custom filters for things like diameter, pressure, kilowatts… without tag-based filtering our site is not going to be usable!”
And yeah I know the lack of tag filtering is a big problem for some stores and possibly a dealbreaker when thinking about upgrading to a Shopify 2.0 theme.
It’s ok - you are still going to be able to provide those types of filters, but instead of tags you are going to be using metafields.
Metafields are custom fields that you create that show up at the bottom of the product admin page (once you set them up).
Step 1. Define (create) the metafield
Defining the metafield is when we create the field and say what it will be used for. We do this on the Settings > Metafields page.
After we define it, the field will appear on product admin pages and you can fill it out with some value.
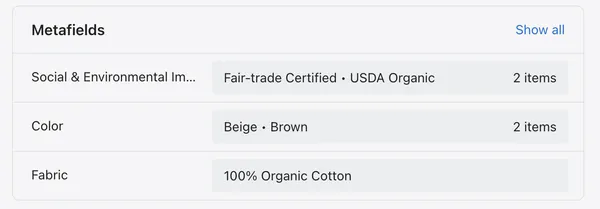
So I have a rather interesting example. Let’s say my store is like an ehtical, eco-friendly clothing or maybe organic food or something, and I want provide my customers with the ability to filter by products that are:
- Certified B-corp
- Fair-trade Certified
- USDA Organic
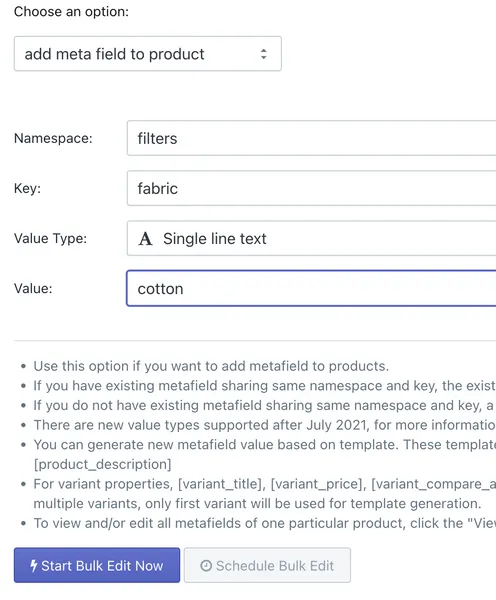
Let’s create a new metafield called Social & Environmental.
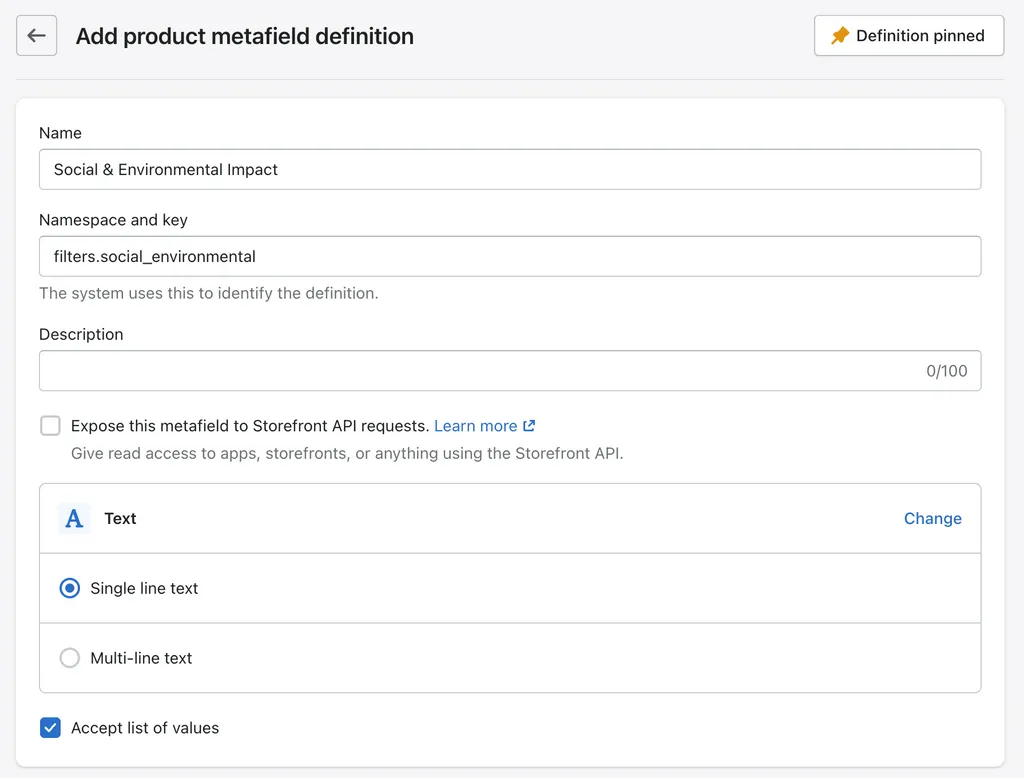
And the namespace and key is like an internal name for this metafield, like an ID. It’s what you would use to output this metafield in theme code, which we are not doing today, but we still want to have clean naming.
So what I do whenever I’m making a metafield for a filter, is the namespace is ‘filters’ and then the name of the filter.
It will accept a text input. Single-line text because its not going to be a whole paragraph - none of your filters are going to be a paragraph.
Optional: Accepts a list of values.
And then you have this checkbox for accepts a list of values. If we check this we can apply multiple values to a product, which is usually what we want.
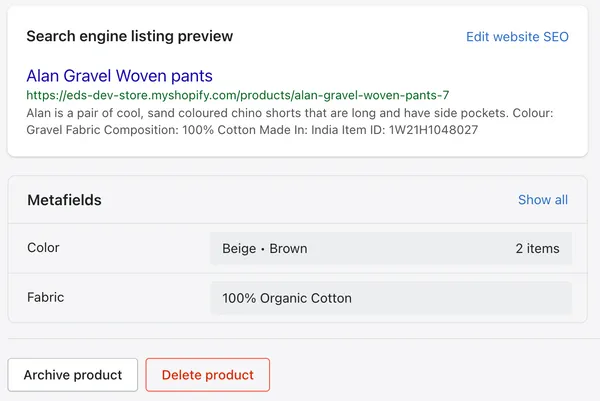
A common example is if you’re using metafields for color, and it’s between two colors - like you’re not sure if it’s brown or beige.
You want it to show up for either one - so if a customer is filtering by brown, they will see these shorts, if a custom is filtering for beige, they will see these shorts. You don’t want it to be limited to just one category.
However sometimes you do want it limited to one category. For example if you’re selling water bottles and they are a certain capacity, they can’t be both at the same time, right.
So in my example, a product can be both fairtrade certified and organic, and we want it to show up under both of those filters, which is why I’m checking this option.
Optional: limit to preset choices.
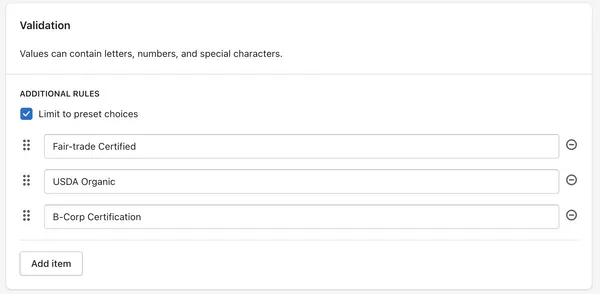
Usually when you fill out metafields on the product page you type out the entire text.
But if you want you can pre-define a few options and then you just have to click them to add them to the product.
This makes it easier so you don’t have to type it out, and also less prone to typos.

Step 2. Fill out the metafield - same as tagging
This part is pretty easy. Now that we’ve defined those metafields, you can go back to your product and you will be able to see those fields and fill them out with some values.
The only issue you might have is that you need to do this for a lot of products. In some cases, thousands, which would be a lot of manual work.
Bulk editing metafields for filters
If this is the case then there are a couple apps that let you do edit metafields in bulk.
The first is of course Metafields Guru for setting up metafields in bulk. It’s the best app specifically for working with metafields.
Second one is Matrixify - for exporting certain product values to a spreadsheet, editing, and then re-importing without overwriting the whole product (which is what Shopify’s default export/import feature does). This is not just for metafields, its a very useful app for large stores.
Third one is Bulk Product Edit & CSV import because this is an automation app - you can set a task and just let it run on all products in your store. For example, you can target all products with a certain tag, and apply a certain metafield - so this is how you would migrate your tags to metafields.
Step 3. Activate filtering by that metafield
Finally, all that is set up and we can simply activate the filter, through the filters menu.
Click Add Filters, and under Metafields you can see the new metafield you created, check that box and save, and it should appear on the front-end of your website.
That’s almost all there is to filters using metafields.
Color filtering
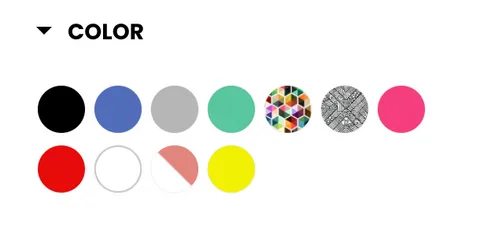
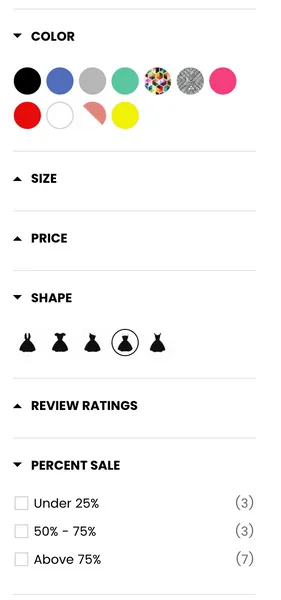
Now there is something important that I skipped over and that is color filters. You might have noticed that on my store I have Color as a product option and I am also using color as a metafield on the shorts with Brown and beige.
Color filters are quite a complex topic. So I won’t be getting into them too much in this article because that will make it a bit too long. I will be making a separate article, so if you’re reading this in the future, check my site or channel for the Shopify 2.0 Color Filters video/article.
But I’m going to quickly summarize the problems with colors filters so that you understand the issue.
The first problem is that some products have very complicated color names.
Here I have these backpacks that are a single product with color options. And if we open the color option filter we see a bunch of these colors with confusing names.
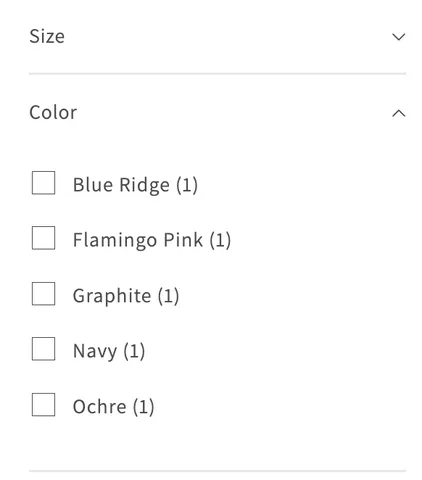
Other stores might have various shades of the same colors like blue, navy, aqua, ocean blue… and you don’t want all of these showing up so a customer is forced to click all those if they want just any blue.
So for many stores the best solution is to create a metafield for a generic color like just “blue”. And all those products that have all those different shades of blue, would simply have a metafield with the value of just “blue”, and when a customer filters by blue, all those products would show up. You’re not forcing a customer to click all those different shades.
This is what I am doing on the above screenshots with brown and beige.
The second problem with color filters is that you probably want these filters to show up with color swatches and not just the name of the color in plain text.
If you want swatches then depending on what theme you’re using you might be in luck. Some themes that offer swatches on the filters are smart enough to understand the word color, and to activate the color swatch regardless of if you’re using the actual color option or a metafield. They see the metafield is using the word color, and they activate the swatches.
And for these themes usually you need to upload a .png of that color to Settings > Files for it to show up. But I will be going into detail on all that in the other video/article.
Other themes are not smart enough to do that. You might need custom code or they don’t offer color swatches at all (like Dawn).
Filtering apps
All this being said, if the new filtering system just doesn’t suit your needs, you can still just use an app.
An app often gives you the best of both worlds, because you can filter by price easily, and you can still filter by tags, so you don’t need to update your entire tagging system, and they give you color swatches that you can upload each color.
The UI is also very user-friendly, so its kind of the easiest and most fully-featured solution.
However as you may know the downside is that apps do slow down your pages loading speed a bit, and obviously they cost money on a monthly basis.
If you’re going to use an app for filtering the one I recommend is called Product Filter & Search by Boost Commerce.
Yes I will get paid a small commission if you click that link. However, I’m not recommending something that I wouldn’t use myself. This is what I use on my clients stores, and it works very well compared to other filtering apps I’ve tried, which tended to be really buggy.
It’s also the leading app on the Shopify app store, so I’m not recommending something weird. If you do use that link, you’ll be supporting the channel and I’ll be very grateful.
And actually, if you want a tutorial on setting up filters using an app, then let me know in the comments because I can show you how I use it on a real store.
That’s all for today guys. If you have any questions leave a comment, and I’ll see you next time.