
If you run a Shopify store you might have heard about Shopify 2.0. It’s a major update with a lot of new features that was released in June 2021.
But a lot of the media around it has been focused only on the benefits for theme developers. So what are the new features and the benefits for you — the store owner?
I’m here to tell you all you need to know about Shopify 2.0. Because it just got way easier for you to DIY your own store and make it better in every way, without the help of a developer.
Note: You also need a Shopify 2.0 Theme
Part of the new features are in the Shopify admin, and part of them are in 2.0 compatible themes. So if you haven’t yet upgraded to a 2.0 compatible theme, now is the perfect time.
Don’t worry, I’m not telling you to buy anything. If you’re using a theme you bought a while ago, you should be able to get the latest version for free because version updates are usually included in the theme licence.
And if you’re using a free theme like Debut, you have a variety of free Shopify 2.0 themes to choose from.
With that said, let’s begin with the first and most important feature — sections everywhere.
1. Sections Everywhere — on all page types
For most people this is probably the most exciting and useful part of Shopify Online Store 2.0.
Dynamic Sections are draggable blocks of content that previously we could only use on the home page.
On other page types — such as the product page, collection pages, or static pages like an about page — you didn’t have access to dynamic sections. You couldn’t drag sections around. The section order was fixed in place.
And if you wanted to display more information and extend your page, you couldn’t add more sections to do that. You were limited to your theme’s pre-built layout.
Well now Shopify 2.0 gives us ‘Sections Everywhere’, meaning that all of the sections that were available on the homepage, are available on every page type.
This is huge because it almost makes Shopify a page builder by itself. You can create unique pages by assembling all of the sections available in your theme into any order you want.
And you can add as many sections as you want to create long and fully fleshed-out sales pages.
It’s even possible to add extra sections into your theme.
2. Blocks inside of product main
Another side-effect of sections everywhere is that we also have blocks in many more places. Blocks are kind of like sub-sections, or sections inside sections. For example in a section that displays a slider — each slide was a block.
In my opinion, the best use of blocks in Shopify 2.0 is in the main product information section. It’s usually the column to the right of the product image. The part where you see the product price, quantity and buy buttons, the description, and other info.
Thanks to section blocks in Shopify 2.0, you can now drag all those information areas around and re-order them as you see fit. You can also hide or disable them if you want. And you can include new types of content — images, size charts, nutritional tables.
You can even add custom code as a block, which is a pathway to many abilities, some of which you can find on my channel.
The tutorials on displaying inventory count, a related product, or a text field to add gift notes or engravings, are a few examples where I use the custom liquid block. This is because it’s the easiest way to add code to your site without digging around in the actual theme code.
3. Save Different Page Templates
This one is also connected to Sections Everywhere.
In the old Shopify, when you edit a page in the theme customizer, you are editing the ‘default template’ for that page type.
For example, the product page layout — which will affect ALL products. Or the layout for all collection pages, all blog posts, etc..
But in Shopify 2.0, you can now duplicate the page that you customized, and save it as a different template, which you can then apply to individual products, collections, etc…
This is really useful if you have different types of products — maybe you sell gift cards or subscription products and you want the layout and information on these product pages to be different from your regular products.
In this case you can just create two (or more ) different product page templates.
Another common use is for different types of collection pages.
If you have a special collection that is on sale or promoting a newly launched product, you can give it a custom design with a large sale banner and promo blocks. While your other collections remain as they always were, with a more basic design using the default collection template.
Lastly, a very good use of this is to create sub-collections.
Creating sub-collections in Shopify 2.0
Shopify doesn’t officially have sub-collections in the way that other platforms do. All collections are the same ‘level’.
So if you wanted to mimic sub-collections for the sake of organization, customer experience, or SEO, it was always kind of difficult. You sometimes could do it with a navigation list , sometimes you needed to copy and paste code.
Luckily this is no longer the case — you can get it all done in the theme editor by using page templates and sections.
I highly recommend creating sub-collections now that it’s so easy, because they are great for SEO. Google’s algorithm loves to see pages organized by category and groupings of similar products on each of these pages.
You can find an in-depth tutorial on my Youtube channel — https://youtu.be/6xABjVe_wsc
4. Shopify Metafields (Custom Fields)
Finally a long-awaited fix for an annoying limitation of Shopify.
In the old Shopify, we had a strict limit on what information we could provide for a product. There was the product title, the description, the price, the product type, tags… and not much else.
Everything you wanted to say about your product had to go into the description field.
This meant that it was difficult to format or present this information in a nicer way than the options that the description text editor gave you.
Some themes had tabs so you could add extra information like a size chart or shipping info, but usually this would contain the same information across all products. So this is fine for those types of content — shipping info is usually the same across all products.
If you wanted to make information that was unique for every individual product, that was hard to do. Often you would need to hire a developer for a custom solution.
But now it’s possible with Metafields.
Metafields allow you to create custom fields that you can then fill out in the product admin page.
Fable & Mane are a perfect example of what can be done if you use metafields to input product-specific data into the tabs, in their case the product use and ingredients lists.
It’s not only for tabs though. Metafields can be used to store any kind of data. And 2.0 themes will then let you output these fields inside any section or any block on the product page.
This makes it possible to make the entire product page completely unique for each product, not just what’s in the description field.
You aren’t locked to the same old Shopify product page structure anymore. You have the freedom to tell a story about your product, and make the product page more like a beautiful marketing landing page.
Learn how to use Metafields — https://youtu.be/Dh7EyD7-o50
5. Easier App Integrations (App blocks)
App installation used to be a pain. You would often need to copy and paste code into your theme.
A simple example is a reviews app where you want to show star ratings under the product title. In the old Shopify you would need to enter the code editor, find the product liquid file, find the <h1> where your product title is, and paste a line of code below that.
In more complex apps like for product options, upsells or bundles, there would be 6–8 files you need to change in specific places. This was confusing even for me as a developer.
Thankfully that is now in the past.
Apps are now added via sections and blocks. When you install an app to your admin, the sections and blocks for that app will appear as an option in your theme customizer.
This is so much cleaner because you can now add an app block, drag it around anywhere, show/hide it, use it on different templates for different product types… and when you uninstall the app it’s gone without a trace. No code snippets to remember and clean up afterwards.
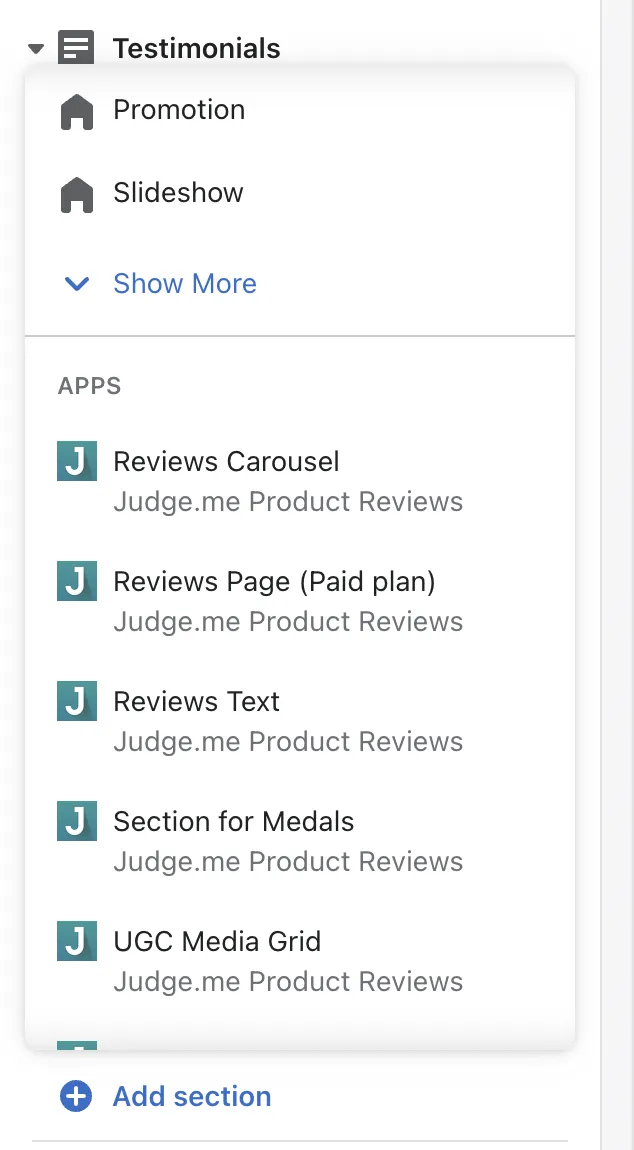
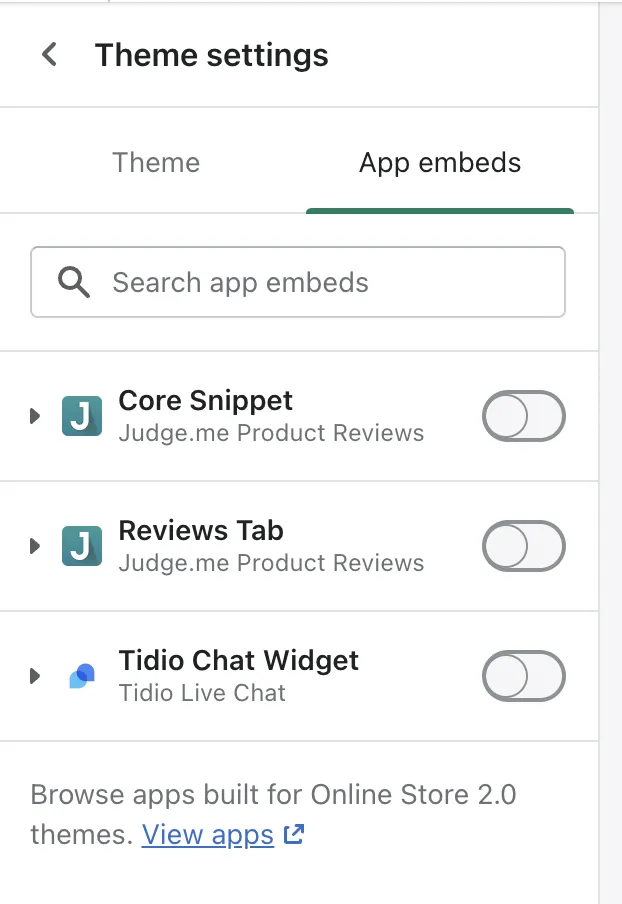
You can also enable and disable apps that function on the entire store (like a popup app or chat bot) by using app embeds. You will find this on the general settings page.
6. Custom Liquid Sections & Blocks
The custom liquid block makes it easy to add custom elements whenever you need to build something that doesn’t exist in your theme.
Rather than going into the theme code and adding code somewhere there, we can just add a block in the theme editor. Keeping it separate and not messing anything up in the theme code.
A good example is my tutorial on displaying the inventory count. We use a custom liquid block here because we need to write some code to output the number.
Another tutorial I made shows how to add a custom text input field on the product page. This is only possible thanks to the custom liquid block. Otherwise the instructions would have to be different for every theme.
The bottom line is even if you know just the basics of HTML and CSS, this gives you a lot more control over your store. And even if you don’t know HTML and CSS, you can follow step by step tutorials from channels like mine to get things done.
7. Filtering Changes
Previously in Shopify you could only filter by tags. If you wanted more advanced filtering options — like filtering by price — then you would need to install a filtering app.
This wasn’t a good solution to be honest, because a filtering app is a big and heavy thing. It decides which products display on the collection page, meaning it needs to replace the entire contents of that collection page. This leads to bugs and makes it a pain to maintain or modify when you want to edit the collection page.
Now filtering by price, size, brand and others is built-in by default.
Filtering by tag is depracated, it’s replaced by filtering by product attributes, product options, and metafields.
I already wrote a huge article about collection filtering so I won’t repeat myself here - go and check out the article on Collection Filters in Shopify 2.0.