
Quick answer:
Normally you can add a video to the product media area, or you can add it in the product description.
But there is a third way that lets you add the video anywhere on the product page using custom liquid and Metafields.
We can use the ‘multi-line text’ metafield to add our embed code to our product.
Then we output that code by using the Custom Liquid block in the theme editor. The liquid code would look like this:
{{ product.metafields.custom.video.value }}
You might also need to make your Youtube video responsive (depending on your theme), so that it resizes correctly to fit the area you’ve added it to.
For that you can follow my tutorial for responsive youtube videos in Shopify.
If you want you can even add the video inside an accordion.
Read on for the full instructions, or watch the video:
Adding videos to Shopify the normal way
I’ll explain this first so you can see the difference.
You typically have two options:
Option 1: Add the video to product media
The typical way to add videos to a product is into the product images / media area, usually to the left side of the product page.

It looks ok here in Dawn theme with thumbnails
Depending on your theme, you may or may not like this method. Dawn didn’t always have thumbnails, previously it used “stacked” images, which looked terrible with a video. Some store owners also worry that customers don’t notice the video if you have lots of images.
But if you want to do this it’s easy.
You have two options for hosting your video:
1. Upload the video to Shopify.
There are some limitations:
- Video length: Up to 10 minutes
- Video size: Up to 1 GB
- Video resolution: Up to 4K
- Video file type: .mp4 or .mov
2. Host it on Youtube or Vimeo.
After uploading to Youtube or Vimeo, just go to your product images and click “Add from URL” and paste the link to the video.
Some store owners don’t like this because when the video ends or is paused it shows suggested videos and looks ugly and distracts your customer.
Option 2: Insert the video into the product description
You can add a video into your product description by clicking the “insert video” button, and pasting in your embed code.
A common problem is your video will be squashed, cut-off, or jutting out of its container, especially on mobile.

Here it is too wide on Dawn theme version 6.0. This has been fixed in Dawn 8.0.
To fix this on your theme, you can follow my tutorial to make the video responsive so that it resizes according to its container.
But I don’t like adding videos to the product description.
I prefer to have the video in a separate block, so that I can freely drag it around the product information area and position it anywhere I want.
My Way: Embedding a Video Using Custom Liquid Blocks & Sections
Sometimes you want to add a video to the right side of your product page into the product information area using a Custom Liquid block.
You might also want to use the Custom Liquid section to add a product video in full-width lower on the page, below your main product section.
There are several scenarios where this makes more sense:
- An instructional video how how to use your product.
- Review videos - there could be multiple you want to add.
- You just prefer the design, or you want to make the video more visible.
- When the video ends it shows suggested videos and looks ugly and distracts your customer.
Shopify doesn’t make it clear how to do either of these things.
There is also another important point:
We want to add a unique video to each product.
At least, that’s what I’m assuming if you searched and found this article.
If you don’t want to add a different video for every product, then it’s easy. You don’t even need this tutorial.
Just add a custom liquid block and paste your youtube embed code in there. But that will show the video on all products, or at least every product using that template.
In this tutorial we will add a video that is different for every product.
To do this we are going to use Shopify Metafields.
If you’re new to Metafields, they are a way to add extra fields to your product admin.
When creating products in Shopify admin we have default fields like Title, Description, and Price.
But we can also add our own for anything we want by using Metafields. For example fabric, nutrititional information, or a product video!
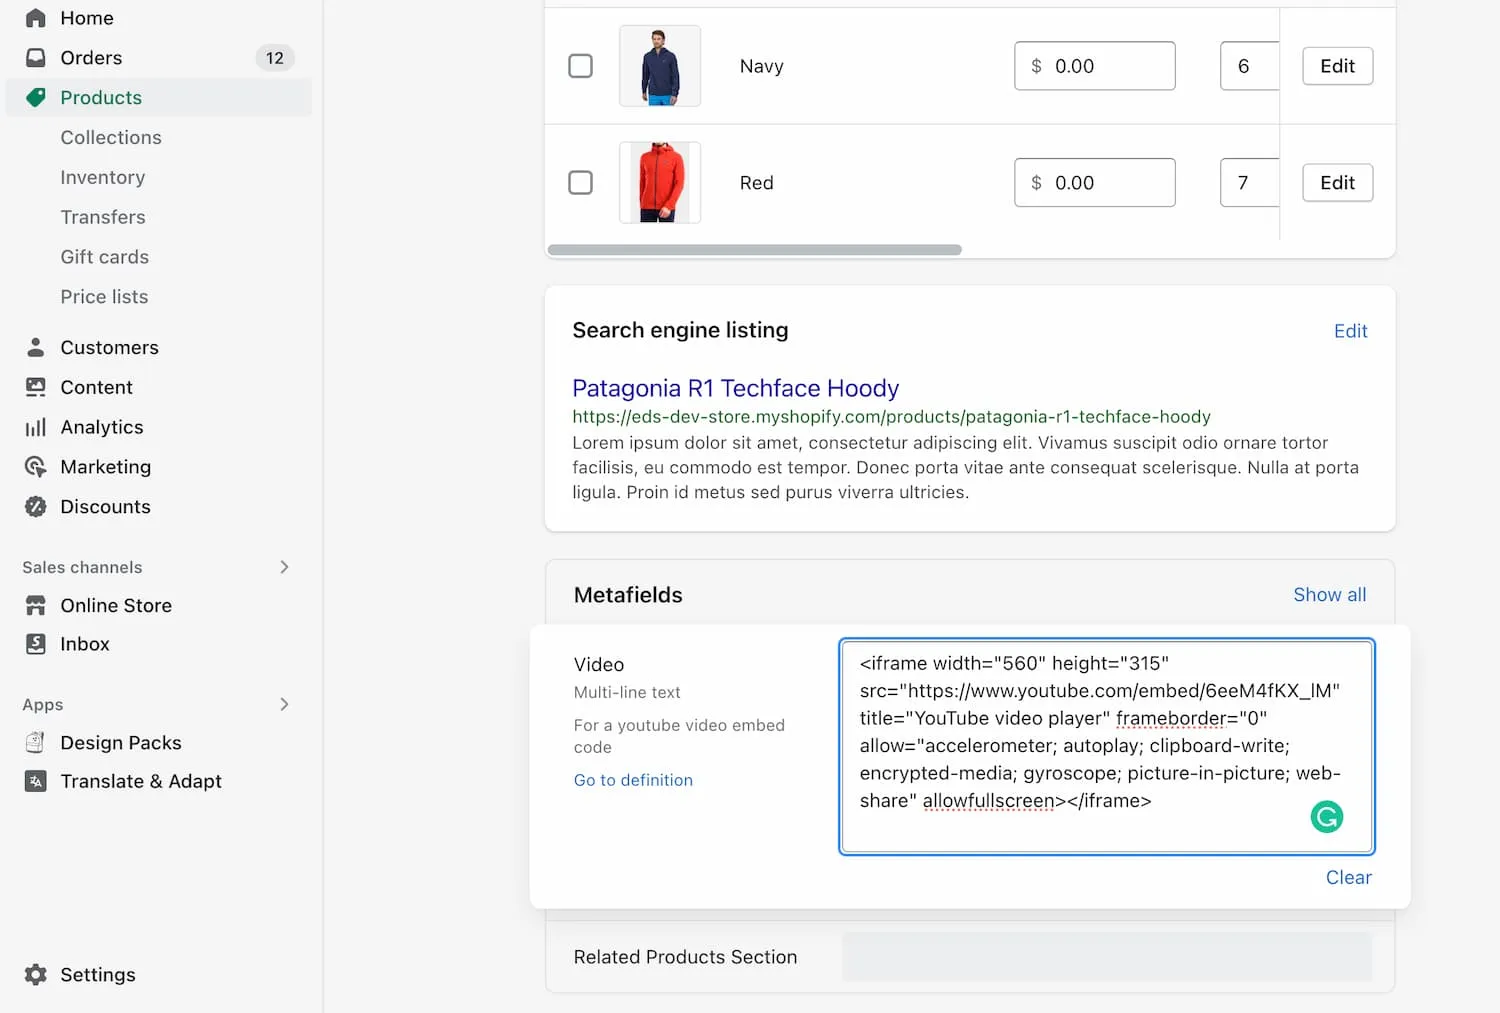
Step 1: Define your Metafield
- Go to Settings > Custom Data > Products and click “Add Definition”.
- The name can be whatever you want, whatever makes sense to you.
- The namespace and key are like an ID that we use to get this data in the code later. It can also be whatever you want, but in the format namespace.key.
- Description is just for you to remember what this metafield is for, a year later.
- Click “Select type” and choose “multi-line text”. Don’t worry about the Validation section.
- Save

Step 2: Fill out the Metafield on a test product
In the next step we will add the code to output the Metafield, but first we need at least one product to test on.
- In Shopify admin, go to any product page.
- Scroll down to the bottom and you should see you new video field. If you don’t, click on “Show all”, or go back to Settings > Custom data and check that your field is pinned.
- Add your youtube embed code inside the field and save.
Step 3: Output the Metafield in your theme
Ok so normally you output Metafield values using the “dynamic sources” button in your theme, right?
Well your theme won’t have any sections and blocks that will output code. Thats’s because they are always of a certain “type” e.g. text, image, product.
So we are going to use a custom liquid block to output that code manually.
- Go into your theme editor and navigate to your test product
- Under Product Information click Add Block and choose Custom Liquid
Now you need the namespace and key from when you defined the metafield in step 1.
If you kept the default settings like me, then your namespace and key are ‘custom.video’.
In that case here is the code you will use to output the Metafield:
{{ product.metafields.custom.video.value }}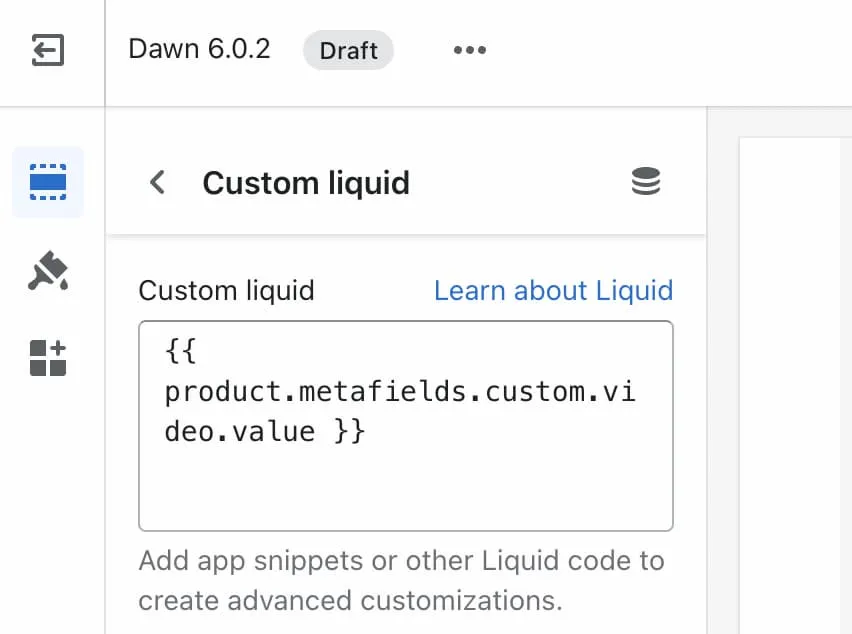
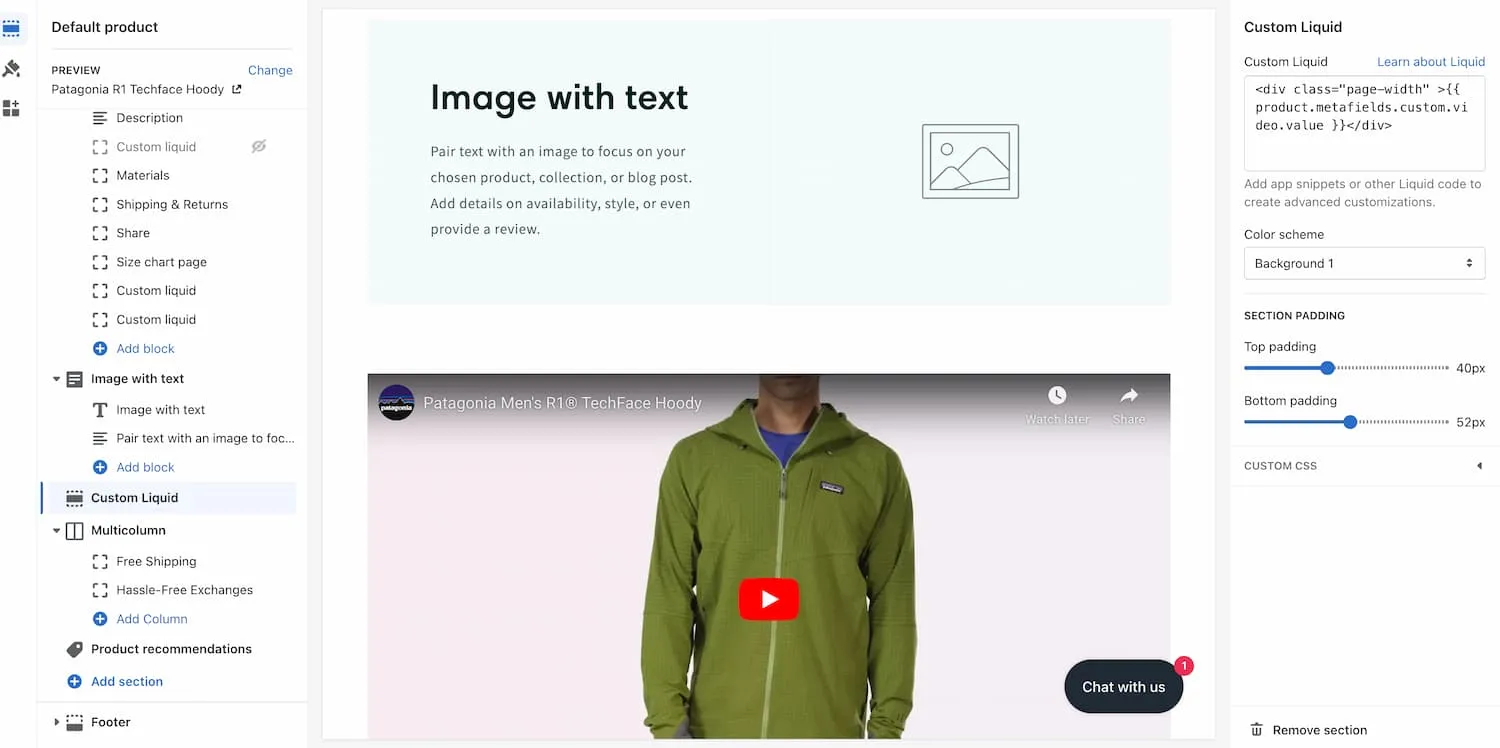
Your video should now appear on the page.
It’s in a custom liquid block so you can drag it around to wherever you want.
If you notice that it’s too wide, cut-off or looks bad on mobile, you probably need to add a responsive video fix.
For that you can follow my tutorial for responsive youtube videos in Shopify.
What about a Custom Liquid Section?
If you want to show the video in a full-width section lower on the page, the process is almost the same.
- Add the section to the page
- Add the above code into the custom liquid field.
Often your theme will have no container and no centering on the Custom Liquid Section.
This is the case in Dawn theme, where the video will be displayed way off to the side of the page.

Dawn requires a container div to add padding.
To fix this in Dawn we need to add a <div> element around the metafield code, with a class of “page-width”.
This will also work for any of the free Shopify themes like Crave, Sense, Taste and others.
<div class="page-width" >{{ product.metafields.custom.video.value }}</div>Finally, if you want the video to stretch to the full width of its container, you can use my responsive video code.
Other themes:
If you are using a different theme, it won’t be “page-width”. It will likely have a different class name for the container.
Unfortunately I can’t tell you what it will be called.
You can right-click on any place in your site and click inspect to use the chrome inspector and have a look at other sections of the page.

Using the chrome inspector to identify the container class. It usually has a logical name.
Try to identify a common class they are using. Usually it would be called “container” or “wrapper”.
If you can’t find anything, you can at least add a max-width to the div, like so:
<div class="page-width" style="max-width: 1100px;" >{{ product.metafields.custom.video.value }}</div>